Showing posts with label Tutorials. Show all posts

Friday, July 5, 2013

Tutorial: DIY Fabric Wrapped Iron On Photo Canvas

I am an avid photographer and I take many, many photos.  I like to incorporate favorites into our decor so we can be surround by happy memories in our home.  I am a huge fan of canvas prints and awhile ago I saw some that were 5"X7" and thought it was a cool size and option.
On Monday I reviewed an HP® Officejet 7500A Wide Format e-All-in-One Printer from Staples.  When I first got it, I was eager to try and figure out several ways to use it.  I had some printable iron on transfer sheets leftover from another project and decided to try making my own version of a wrapped canvas with them.  I shared these at the end of my review post with a brief description and today I have a more detailed tutorial with pictures to help you make your own.
Start with a blank 5"X7" pre-wrapped artist canvas.  Mine was purchased at Joann's while 40% off for a few dollars.
Print your photos onto the transfer sheets following the direction for your particular brand.  Mine were Jolee's Boutique Easy Image Iron On Transfer Paper for White Fabrics and I have no idea where I purchased them.  These have red lines on one side so you know which side to iron on.
Cut out each image on the transfer paper and follow the instructions for your brand.
I waited until cooled to peel off for a gloss finish.  I like how you can still see some of the texture of the fabric underneath the image, which mimics the look of photo canvases.
Trim your fabric leaving enough border to wrap around the sides of your stretched canvas.  Sorry for the color change in this photo, I had to take this one at night with my flash.  Note that jagged edges on your fabric are fine as you'll be stapling it to the canvas and no one will see them.  Carefully place your image over your canvas.  Fold over edges of fabric and staple into place.
Now you have your own little canvases to show off favorite pictures and add some interest and variety to your home decor.  They can be used as table top displays or hung on the wall without needing a frame.  I purposely left "empty" space in both of my DIY photo canvases so I can add some fun dimensional embellishments right on top of the photo.  I might be as simple as each child's name in chipboard letters or AC Thickers but I haven't decided.  I am kinda liking the minimalist look for now.
I love this picture I took of my kiddo in Traverse City next to this free print from Jones Design Company, which was also printed on the HP® Officejet 7500A Wide Format e-All-in-One Printer from Staples I reviewed.


Signature

Wednesday, July 3, 2013

Freebie: Chid's Art Poster Print Template

On Monday I reviewed an HP® Officejet 7500A Wide Format e-All-in-One Printer from Staples and in that post I shared a Child's Art Work Poster Print I created using a template I made in Photoshop Elements.  I'd like to share the template with you, click here to download the file at Dropbox.
This is the first time I've tried sharing a PSD file and using Dropbox so let me know if there are any problems or issues and leave your feedback as to whether or not you like this method.  I am currently using the free version but I might upgrade if this freebie is well received and there is an interest in more.
When you open template in Photoshop Elements it should look something like this.  Each photo space has been labeled and is in it's own layer.  The text has been added for placement and you can easily switch it to whatever you'd like.  A font substitution may occur if you do not have Nadine 2 loaded on your computer.  If you'd like the exact same one I used, you can download it for free at the Font Palace.

My template has been sized to fit in a NYTTJA frame from Ikea that are only $3.99, doesn't get much more affordable than that!  Since it's an odd size at 11.75"X15.75" you can resize the template to fit your frame.  To do this, I suggest choosing all of the layers, except for Layer 1.  The simply drag all of them at once onto a new blank file that has been sized for the frame you'd like to use.  While all the layers are still chosen, drag the corner to resize for your new blank file.

If you have not used clipping mask before, here is a tutorial I like, but a quick online search will yield many options for you to check out.  You may be able to use this template with other programs that use layers but I only have experience with Photoshop Elements so I am not sure.  But since the template if free to download, it's worth a try!  If you do try using it on another program please let me know the results.
In no time at all you will have your own version of this cool poster print.  Click image above for a better preview.  I printed my poster print with the HP® Officejet 7500A Wide Format e-All-in-One Printer from Staples I reviewed and onto HP Advanced Photo Paper, 13" x 19", Glossy.

If you do not have a wide format printer, you can have it done commercially, I suggest the Costco Photo Center for well priced enlargements.  The 12"X18" prints are $2.99 at my location, which will fit the template as it's originally sized.
After finishing adding your images to the template, flatten the layers and then drag onto a new blank 12'X18" file, flatten again and save as a JPEG file.  Send off to print.  You will just need to trim it down to fit the frame.  To make it easier, I laid the plastic insert over my print, traced, and cut.

This might all sound confusing but it really is easy with a little practice!  

Signature

Saturday, December 22, 2012

5X7 Quick Mini Books: Making a Easy Brag Book

Think times run out to make a handmade gift?  Here are some of the quickest mini books you'll ever put together!  I made both of these in one night, in just a couple of hours.  Since a lot of the assembly is repetitive you can make them assembly style and make several at once. 

You'll need double sided papers, chipboard, binder rings, assorted embellishments, and ink if you like the look of inked edges.  It might sound like a lot, but I know most of my paper crafting divas have all this stuff on hand in their stash.  This is a good time to pull out a coordinating paper pad so you don't have to spend time trying to figure out what looks good together.
{Cutting Guide for Pages}

You can get four 5X7 pages out of one 12X12 sheet of double sided paper if you cut wisely.  Keep in mind that the designs on most pattern papers will mean you'll need to use two for a horizontal book and the other two to make a vertical book.  Cut as many of these as you need to make the book the length of you want.
Cut two pieces of chipboard and cover both sides with papers of your choice from the stack you just made for your pages.  I chose embossed papers for the covers to give it a fun texture and soft feel.

Arrange your papers, place your stack of pages inside of the covers, and punch holes for binding.  Decorate pages as desired.  I used punched ticket shapes to add spots for journaling, die cuts, and layered stickers.  The recipient can simply add their pictures to the pages that act as embellished photo mats.
I used a coordinating line of paper and embellishments from my holiday stash to make this quicker to make.  Things just go faster when I don't have keep searching my stash for matching embellishments.  You may remember these supplies from my Dec 2010 mini book, Part 1 & Part 2

Here is a look at the inside of my book.  I removed the decorative ribbon to make it easier to photograph to share with you.
I suggest you tell your recipient to disassemble that pages when adding their pictures.  The bulkier layered stickers can make things lumpy and it's easier to attach them with double sided tape if they aren't in a stack.  Then re stack, put the rings back in, and tie back on ribbons for a quick mini book.

Below are the rest of the pages from the Horizontal Quick Book, tomorrow I'll have the Vertical version to share.  These fit standard 4X6 pictures quite nicely, with some trimming to allow for the embellishments and binding holes.
Signature

Monday, December 12, 2011

Post It Note Holder Tutorial

Last week I was in charge of my sorority alumnae group's craft night.  I made each of the attendees a little thank you treat, these quick and easy post it note holders.  This tutorial will help you make a basic folded version. 

To Make One Holder:
  • Cut cardstock to 7.5 X 3.5 inches
  • Score at 3.5 and 4 inches in along the sides that are 7.5 inches.  Easiest to do with either a score pad or paper trimmer with score blade.
  • Fold at score marks, up and over, and you have the basic structure completed. 
  • Take a stack of post it notes, mine are the generic brand from Target that come 4 for $1.97, and glue to the bottom.
  • From here it's really up to you on how to decorate it.
Decoration:
  • Cut solid color cardstock mats to 3.25 X 3.25 inches
  • Cut patterned paper to 3 X 3 inches
Assemble in this Order:
  • Make holder
  • Put together decorations for both sides of the holder's outside.
  • Glue on decorations to the outside.
  • Glue in the stack of post it notes.
{Front and Back}

Tips: I used a glue stick to attach all papers, it was the cheapest way to adhere paper to paper.

Signature

Shared at: Made by You Monday at Skip to My Lou, Holiday Gift Ideas Link Up at Tatertots and Jello and Tickled Pink at 504 Main

Tuesday, December 6, 2011

Wooden Photo Ornament

A very special ornament has been added to our tree this year!  I made a whole bunch of these photo ornaments last month, as favors for LB's baptism.  One the front is a wallet sized picture left over from a portrait package and on the back is information about his birth and the baptism date.  It would be really easy to adapt the project for any photo.

They were very easy to make, if a little time consuming due to drying time between steps because I was making a baker's dozen all at once.  I did mine assembly style, watching TV while I worked, and got everything done in an evening.

Supplies:
  • Unfinished Wooden Discs, mine were 29 cents each
  • Drill/Handy Husband
  • Photos Sized for Discs
  • Mod Podge & Foam Brushes
  • Decorative Paper Scraps
  • Decorative Paper Sheets - for printing the backside of Ornament
  • Ribbon
  • Misc. Decorative Embellishments
To Make:
  1. Drill holes for hanging...or do as I do and have your husband do it.
  2. Sand the surfaces and edges, you can skip this step if you get nice smooth discs but because mine were cheapy ones they needed a little help.
  3. Paint the edges of the wooden disc and let dry.  There is no need to paint the surface because you'll be covering both sides.
  4. Using Mod Podge, decoupage on the photo, positioning as desired.  Add additional paper scraps and paper trims to cover the entire front side of disc. 
  5. Add a thin layer of Mod Podge to the entire surface of the front side, lay down and let dry.
  6. Type out print for backside of ornament.  I used Word and formatted my page for two columns.  Then I added my type and copied and pasted it to fit six on one 8.5X11 sheet of paper.  Print out on decorative scrapbook paper.  Tip: Do a test print on scrap paper before using your pretty stuff!
  7. By now your first side of the disc should be dry.  Use a varnish to protect the front side and to prevent the slight tacky feeling Mod Podge can leave to projects. 
  8. Now back to your printed out text from step 6.  Hold the disc behind the paper and then up in front of a light source to help you center the text within the disc.  When you like how things look, keeping the disc in place, set the paper down and trace around it.  Repeat for as many ornaments as you want to make. 
  9. Cut out and use Mod Podge to adhere to backside of your disc
  10. Add thin layer of varnish to the backside of your ornament and let dry.
  11. Add ribbon for a hanger.
Variations: Save a step and size your photo so it will over the entire side of the wooden disc.  Then you won't have to add scraps and trim to fill in the space, saving you additional drying and sanding time. 
 

Signature

Linking Up At:
My World Made by Hand
Homemaker on a Dime, Carolyn's Homework, Holly Bloggy Christmas at Tatertots and Jello, and Tickled Pink at 504 Main.

Friday, November 25, 2011

Tutorial: Handmade Book with Accordion Fold Binding

Happy Black Friday!  In the US it's the official kick off to the holiday shopping season, although the stores seem to want us to plunk down our dollars sooner and sooner every year.  If you'd like to relax instead of getting up at 4 AM to stand in line at stores, I thought I'd show you a quick little gift you can make instead of fighing the crowds.

It's been a little while since I shared a handmade book.  Here is one I love to whip up when I need a quick gift. Nonscrapper receipients love them as they are ready to add standard sized photos too. Here is one I made before Thanksgiving so it would be ready to add a few pictures to right after.  Here is a quick how-to:

For Binding:

Cut paper to 12X6.75 and score every 1 inch for the 12 inches of length.  You will end up with 11 score marks.  Fold at every fold and set aside.

For Pages:

Cut 7 sheets of paper to 6X6.75 with the longer length as the vertical measurement.

Tip: I suggest using thick double sided papers for you pages.  This is a good project to use your fancy embossed, flocked or glittered papers with as people will really get to feel and see the textures.  As opposed to when you use them on scrapbook layouts that will be kept inside of plastic page protectors.

To Assemble:

Lay your binding strip up starting and ending with a valley fold, meaning one that makes a V shape when you look at it from the side.  Glue one of your 6X6.75 pieces on top of the end flap, as shown above.
Continue adding sheets of 6X6.75 as shown above, here are what it should look like with two glued on.
Keep adding your 6X6.75 sheets until six have been glued to the binding pleats.  You will have one open flap left.  DO NOT glue down.
Use your seventh and last 6X6.75 sheet of paper for the cover.  Take open flap and fold over, shown above.  Add glue to just the top of the flap (the paper with the basket, trees, and leaves) and then attached your cover 6X6.75 sheet. 
Here is a view of the completed inside of the book, before we add the binding, which is necessary so the folded pleats will stay closed and the project will appear more book like.

These are the compled pages and what you will stick inside the binding after the next steps.

To Bind:

Cut a sheet of 3X6.75 paper.  Score at one and two inches.  Fold as shown above.  Then cut a piece of chipboard, i.e. extra thin cardboard, to slightly smaller than 1X6.75.  Glue in the "valley" between the folds.  This will provide your book binding with extra stability and ensure you can enjoy it for a long time.

Add glue to the sides of the inside of the binding strip, but NOT where the chipboard is.  Slide your pages inside and press down to glue together.

Note: I decided to add a little punched green leaf border to my cover before pressing down the binding to the front and back.  See example at top of post.

Tip: Chipboard is often the extra packing material in scrapbook supplies. You can also use a piece of an empty cereal box or the like.

All Finished!

Enjoy your quick and simple little handmade book.  The dimensions are perfect for adding all your standard 4X6 prints with no or minimal trimming required.
Here is another view of the book from the side so you can see the completed binding.  See the chipboard reinforcing the binding?

The possibilities are endless when you have the basic steps down as you can change the dimensions to whatever suits your needs.  I usually keep the inside pages simple with just a photo and maybe a little writing to keep the book from becoming too bulky.  Let me know if you have any questions.
Signature

Wednesday, November 23, 2011

Support Handmade Spotlight: Release Me Creations


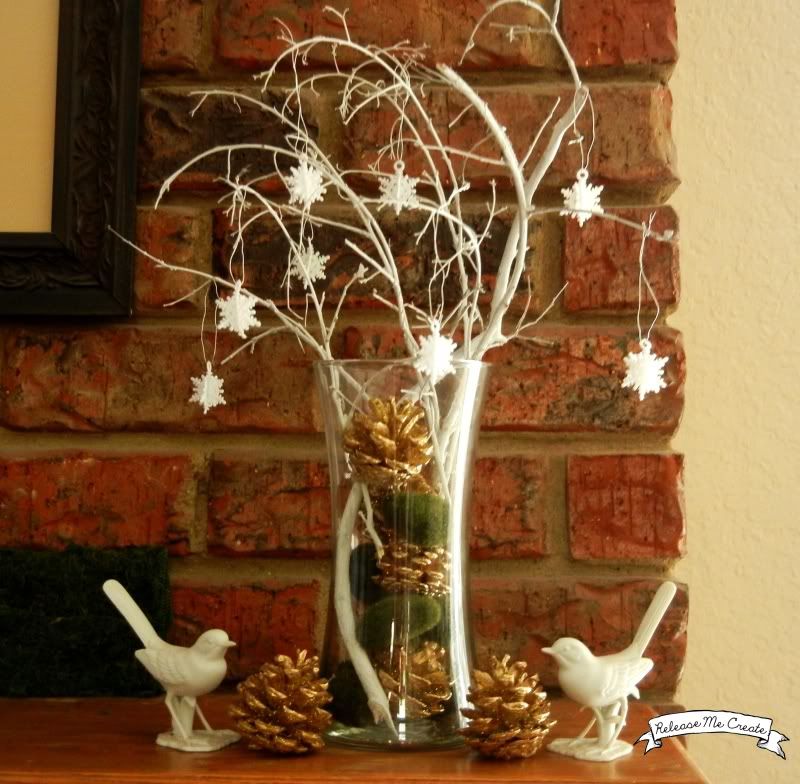
Today we have Maureen for Release Me Create, read on for the FREE SHIPPING code at the bottom of the post:)  She's also got a beautiful holiday decor project to share with you. One thing I really love about it is, that once you make it you can leave it up all winter long!  It's always so sad to me, when all the decorations go away after New Years, because my house always looks kinda bare then.  This is such a fun way to incorporate natural elements into your home for the entire season. 
 
Hello everyone! I'm so very excited to be a guest blogger today on Katie's Nesting Spot! My name is Maureen, and I blog over at: Release Me Create 
Today I bring you this fun, easy, and ultra cheap diy holiday decor project:
WHAT I USED:
-Some small branches
-Pinecones
-Gold spray paint
-White spray paint
-Moss covered styrofoam "stones"
-Tiny white snowflake ornaments
-Glass vase
1) Find some branches just lying about and remove any foliage or extra stems you don't want


2) Spray paint them white (or gold or silver, or whatever color you like)


3) Find some pinecones, spray paint them gold, slap on some glue and pour on the glitter! (No photo of this as I was impatient and didn't want to wait for my camera battery to charge)


4) Travel to the craft store to find some cute things to fill within the vase, and some ornaments to hang on your branches -I found the tiny snowflakes, 
the moss stones, and the vase all for $9 with my coupon 
and their 50% off holiday decor sale at Hobby Lobby! 5) Fill up the vase, add your twigs, hang your ornaments and viola...a cute little holiday arrangement!
I added my little white ceramic birds for a final finishing touch. 


Thank you so very much for letting me join you today!
 
You can come visit me anytime on my BLOG, FACEBOOK, or TWITTER!
 
And if you're holiday shopping, I am offering FREE SHIPPING in my ETSY SHOP
 
Just enter Coupon Code: MERRYHOLIDAY11

Signature
Blog Widget by LinkWithin

  © Blog Design by Simply Fabulous Blogger Templates

Back to TOP