Yesterday I shared the bright and colorful Pocket Letter™ my swap partner Kelli made for me. Today, I have mine to share! This is how I packaged mine all up, using a punched doily, some silk flowers, vintage millinery leaves, and satin ribbon. I could add these extra flourishes because I didn't have to actually send it through the mail.
Before I get too into the sharing, if you're wondering what the heck Pocket Letter Pals™ are, I gave an short explanation of Pocket Letters in my last post. I won't repeat myself here because the best resource for learning more about this phenomenon and getting lots of ideas, tips, and inspiration is from the creator of this concept Janette Lane. Her links are below.
Facebook Group, it's private & you need to request to join
This is what I created. It was a bit of a challenge for me because Kelli favors more of a shabby chic look than comes naturally to me. I set out to incorporate a vintage floral look with her favorite colors, pink and gold. I think I succeeded pretty well and really enjoyed stepping out of my comfort zone. It was great using up some of the pretties I've saved for years, like really gorgeous embossed K&Company paper as the background.
Here is a close of the top row. The gold banner and pink butterflies are both punched out of a Die Cuts with a View Glitzy Pastels 6X6 paper pad. Can't recommend that enough! It's thin enough to easily punch and the glitter doesn't brush off the backing or fall off. I purchased it when paper stacks were 40% off at Joann's so it was a very good purchase since I can make tons of custom die cuts and alphabets with it.
The rose sticker is from my stash and I used it along with a smaller layered rose sticker at the bottom so they would coordinate and help make the Pocket Letter cohesive even though I am using pieces and leftovers from many different scrapbook lines. The word definition is from a larger sticker, I cut out and notched the one I wanted to use, then used little Tim Holtz alphas to spell out "wish". I felt this bit of black balanced out the darker key lock sticker placed at the bottom of the letter.
Now for a look at the how I incorporated Kelli's initials into the letter & personalized it just for her. See that gold washi tape? That wasn't originally supposed to be there. When arranging the square letter Thickers I made a placement error and then ripped the label sticker when I tried to move them. Nothing like layering to save the day!
The middle row came together the quickest. I wrapped up some coordinating twine and decided to part with one of my horded Kate Spade gold bow paper clips, so I could add something really special. On the far right are more vintage millinery leaves I got a few years ago at an antiques fair.
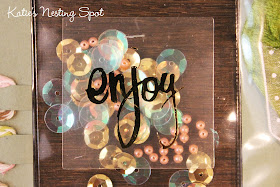
One of my favorite parts of this Pocket Letter is my very first shaker pocket, filled with sequins and mini beads. I thought Kelli might want to remove the sequins to use for projects so I closed the pocket with washi tape for now, but she has a Fuse Tool so if she can use that, if she'd prefer seal it permanently. To finish it off, I staped a little Heidi Swapp transparency with "enjoy" in gold on top of the pocket.
For the bottom row I layered several bits and pieces to create a collage along the three pockets. Elements are adhered to the paper inside the pockets and also right on top of the outside. I repeated the banner, butterflies, rose sticker, and a darker element from the top of the Pocket Letter here as well.
One of the few things a Pocket "Letter" wouldn't really be a Pocket Letter without is an actual letter from the sender to the recipient. I had the perfect mini envelope to house mine in and finally figured out the perfect way to use the gold hand piece I won in a giveaway. It added the perfect touch of extra special, I think.
Like Kelli did for me, I also included some fun goodies for her. I raided my supplies for pink and gold and found some great stuff. By coincidence, we also gave each other the very same Vanilla Caramel tea!
Many Pocket Letter Pals send each other things they've made, like the ribbon paper clip Kelli made for me. I sent her one as well, some punched & stamped tabs, more butterflies, and a few one inch circles I stamped and then punched out. It wasn't much but since this was my first time crafting a Pocket Letter it took me awhile to design and assemble it to the point where I thought it was just perfect. I was stamping and punching these things right up until the time we had to leave to go deliver it!
Have you gotten into the world of Pocket Letter Pals? I'd love to see what you've made! Maybe we can even swap and be pals too ♥


No comments:
Post a Comment
Thank you for visiting my blog, I really appreciate your taking the time to stop by. I love reading all your comments and meeting new friends.