Last month Jennifer over at Simple Scrapper ran a Stash Bash event and since I have a (affiliate link ->) Premium Membership the event was included in my monthly membership price. The special events like this really help make the most of your membership. The girls are so supportive of each other and it's a great community filled with other like minded scrapbookers. I have shared this project on the monthly Community Show & Tell.
Jennifer had several challenges and the #2 Bake Sale got us looking through our stash to make page kits or a project kit. I compiled the supplies above into a project kit, do you like the late night cell phone pic I took? Please excuse the flash! The things included a lot of leftover bits & pieces from previously used sticker packs, kraft cardstock I bought because kraft was really "in" even though it's not really my thing, and a 6X6 pad I got as a gift with purchase that's not my style and that's been sitting around gathering dust.
Originally my intention was to pre-make a Halloween mini album to have on hand this month all ready for pictures from all the various activities we do. Somewhere along the way, I decided it was more in line with the Stash Bash theme to use it with already printed pictures from my photo box. These are mostly photos that never made it on a layout or that I had duplicates. It was oddly exciting to clear up some room in both my supplies and photos!
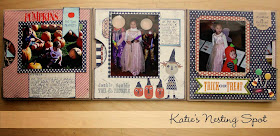
I decided to use the kraft cardstock to make pockets, three of them to be exact, and to put "tags" made out of a sheet of double sided paper from the paper pad inside each one. One pocket has a bonus insert with a little folded photo mat. Here is how the book looks when you open it once.
This is how it looks when you open it once more. You can see the three handmade envelops all laid out and connected. The punched half circles give you a peek of the tags inside. The one of the far right is the envelope with both a tag and a folded photo mat. This mini is approximately 6.25 inches by 6.25 inches. I sized it to work with the 6X6 paper pad with minimal cutting.
Let's take a closer look at each envelope and start with the one covered with the banner paper. Here is the folded photo mat, shown opened.
I used the folded photo mat to put pictures of each of my kiddos in their costume. The inside of the mat is shown above. On the front of this envelope is a picture from pumpkin carving. Since the paper's design is kind of busy, cute but busy, I kept the embellishment simple.
When you open the mini book the pocket you see on the left is covered in diagonal stripes. This pocket is where I put all pictures from each of our trips to the pumpkin patches and cider mill near our house.
This kind of mini book is such a fun way to show the highlights of an event or holiday activities.
When the book is opened, this is the pocket you see to the far right. Inside I was able to put in four not the best quality photos, that look a lot better when cut down into these small sizes. I like how they help summarize the things we saw & did at our trick or treating at the natural history museum.
Since I devoted one side of the tag to my son's pictures, my daughter is shown on the reverse side. Low profile embellishments like washi tape & flat stickers work really well to help make a project like this special. They do not add any extra bulk that might make sliding the tag inside and out difficult.
The middle envelope is one of the last seen when opening up the mini book. This one is about Halloween, the day time activities at school and the kids all dressed up and ready for candy. I thought that little witch and pumpkins were so cute and was determined to make sure I incorporated them. You might be able to see an itty bitty spider on one pumpkin, that's a rub on.
I hope you enjoyed seeing the project I was inspired to work on and complete during Stash Bash. The paper pad is almost gone and I put a serious dent into my leftover Halloween stickers. One thing I found as I was creating, is that since I normally choose bright papers, that I didn't have much that went with these more antique looking ones. I had to research my stash for better embellishments, although I did use several that were in my original Challenge #2 Bake Sale selections. I didn't finish adding my pictures in time to earn all the points for the challenge but using up some products I've had for way too long was prize enough!
I can't wait to show my kids the new album!
Here is another look of at the mini book, this time shown from the side, Below is one more view, that shows the back of the middle pocket. I just covered it with patterned paper. My plan is to go back and add a few more details like the kids ages, the school E was in, where we live, etc. These details are fresh in my mind now, but down the road they may not be so it'll be nice to have a quick reference to refer to.


Adorable mini book! Love the pages and the pockets. So glad to see your paper crafts come up in my feed!!!
ReplyDeleteBeautiful book! Totally inspired!
ReplyDelete