Friday, March 29, 2013

Giveaway! Carmex Healing Cream and Hydrating Lotion

After a long cold winter my skin is dry, dry, dry!  My knees and legs look so rough and dry it's scary, okay well they're not that bad but you know what I mean!  I am definitely not ready for shorts season.  It's a good thing that Carmex was kind enough to recently send me a skin care package with both their Healing Cream and Healing Lotion inside.  I've been using them for about two weeks and they've been just the thing to smooth things out and help moisturize my skin.

The Healing Cream is nice and thick for your roughest parts.  It's great for your driest skin, like your hands, feet, elbows, and knees.  It's concentrated, a lot goes a long way so you only need to use a little, with 9 healing ingredients to help repair your skin and yet is absorbs quickly.  It isn't greasy or heavy feeling...cause who needs that, but does deliver some serious hydration. 

Carmex's Healing Lotion is great for an every day skin lotion.  I liked how light it feels on the skin; it also absorbs quickly.  I've been putting it on at night and love how silky my legs feel now.  The aloe and Vitamin E in it are designed to moisturize, heal, and protect skin from dryness. 

Giveaway!

As I mentioned, I've been able to give my skin some tender loving care with Carmex's lotion set and I get to give one of you a set of both the Healing Cream and Healing Lotion!  It's just what you need to get ready to wear all your pretty summer dresses and shorts!

Please use the Rafflcopter widget below to enter.  Email subscribers will need to click over to enter.
a Rafflecopter giveaway


Signature

Disclosure: Carmex provided a complimentary review sample to both me and is responsible for fulfilling the giveaway.  Winner must be a US resident, 18 years or older, and respond within 48 hours of my email notification.  The experiences and opinions related within are both personal and unbiased by my reviewer relationship with Carmex.

Thursday, March 28, 2013

A Crafty Soiree #135

Easter's this weekend so I know I won't have time to fit in any more projects but I couldn't resist sharing just a few more you linked up last week that are related to it.  For those of you celebrating, I hope you all have the most wonderful Easter Sunday!  I also hope that some sunshine comes around to where you are, if like me, you've been "enjoying" a longer and colder winter than normal!
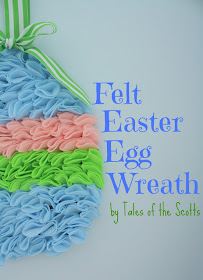
I just had to share this egg shaped wreath from Tales of the Scotts.   Love the layers of soft felt, I haven't felt moved to make any hanging decorations for Easter since I made a plastic egg wreath a few years ago that I still love, but this one I'm feeling compelled to make as soon as I have time so it's ready for next year. 
Lindsay from Kindred Spirit Mommy made her daughter a cute t-shirt style dress out of fat quarters for Easter.  Her daughter helped her design it and helped while it was being made, I bet it will become her favorite outfit.
One of my husband's favorite Easter treats are Cadbury creme eggs, so I bed he'd go nuts over these cupcakes from The Velvet Moon Baker.  What a fun way to enjoy these classic holiday flavors any time of the year.
Another seasonal favorite for many of us are the egg shaped peanut butter cups and Jeri from Simply Sweet Home has the how to for making your own.  Aren't they really pretty in their baking cups?  What a special treat!
My last feature is in no way related to bunny day, but they had me in such a stitch I had to share them too.  Aren't they super kitchy cool?  Gotta dig those mohawks and attitude of these punk rocks, pun probably intended, from Art Club Blog.

Thank you so much for joining us friends!  I am eager to see what you've been making!  Link up below ☺
Photobucket
  • Link up to four of your creative projects (No Etsy stores or other linky parties pretty please).
  • Add your link to the specific posts not the main URL
  • Add a "Crafty Soiree" button to your blog or posts.
  • Please comment on the post linked up in front of you. All party goers love meeting new friends... don't just stop there...if you see something that catches your fancy-- stop by and say hi!
  • Your hostesses would love it if you'd follow us. You can find Malia here.
Photobucket


Signature

Wednesday, March 27, 2013

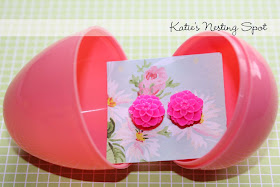
Non Edible Easter Egg Filler - Flower Cabochon Assessories

Last weekend I had the pleasure of coordinating the annual Easter egg hunt for some of our favorite young ladies, my six year old included.  Since there is always a candy overload this time of year I wanted to fill some with something other than sugary treats.
My solution was to turn some super cute flower cabochon's I'd ordered awhile ago on flash deal site.  I just glued them onto some earring blanks, both pierced and clip-ons.  They made dainty little accessories for the girls that will be enjoyed long after the bunny has come by.
I also put together some sweet little hair pins after I was happened across a package of blanks of Joann's.  I was so excited to find these, I used to have to order them online so it was great to know they are more readily available.

There's almost and endless supplies of these beauties available on Etsy.  Wouldn't they also make great party favors for a little girl's party?  They'd also be fun to make as an activity at an older girl's party or at a sleepover.

Signature

Tuesday, March 26, 2013

Project Life 2013: Jan 13-19

This was the first busy week of the year because Brad was gone to Northwestern to install a laser for one of the research groups.  Meanwhile, my Great Aunt Rosemary passed away and my mom, who had planned to come out for a few days to keep me company, was busy trying to make arrangements.  Then there was the actual memorial and funeral at the end of the week, that thankfully Brad was able to get back in time for.
The half of this week's spread represents our week at home and the time when things got really busy in respect to trying to keep the little guy safe and sound.  He learned how to climb up on nearly everything and then, because he's such a busybody, he'd stand up on them too.  He also got to try chocolate covered pretzels for the first time.  I also took some pictures to show how ER practices reading every night, cold mornings at the bus stop, and our pizza and a movie night.
I documented Brad's week away for work with a trimmed down insert.  He took ER's camera with him but it didn't take the best pictures and it was so cold that it was tough for Brad to get out and take pictures of the University.  To get around that I used smaller pictures and had him pick up some postcards with well known landmarks of Northwestern on them.  Then I used the backside of the postcards to journal on.  Or at least I journaled on one, the blank one is for Brad to add his own thoughts.  Which I'm going to have to bug him to do for me.  The green card is about Brad coming home and how we had to rush over to the otherside of town to get to the funeral home.
The entire right side of this week's spread is devoted to my Great Aunt Rosemary and has pictures of the flower arrangement my immediate family sent and lots of the family and friends who came to the funeral luncheon. I also included a screen shot of the online obituary and one of the prayer cards passed out at the funeral home.
A couple of extended family members we don't see often came to the funeral and luncheon to celebrate my Aunt's life.  I wanted to incorporate lots of their pictures but then didn't have room to add their names.  So I wrote them onto a journaling card that I slipped behind the bottom photo and attached a tab to it so it's easy to pull out.  I thought it was a pretty good solution!

Linking up to The Mom Creative

Signature

Monday, March 25, 2013

Baby Boy Scrapbook Pages: Using Divided Page Protectors

For this week's installment of Baby Boy Scrapbook Pages, I'm sharing one way I've incorporated divided page protectors into LB's First Year Album.  As I'm sure most mommies of newborns do, I took many pictures during the first few weeks.  Some don't really have an extended story behind them.  They all kinda fall under the category of sweet new baby pictures, mine seemed to often be of when LB was sleeping.

To speed my scrapbooking process along I have incorporated several divided page protectors by We Are Memory Keepers.  I especially like purchasing multi-packs because you get several designs, giving you lots of choices depending on which pictures you want to use them with.
None of these pictures are fantastic, the lighting was really off and I couldn't ever seem to fix it completely in Photoshop Elements.  To work around that problem, I simply converted two to black and white.
Then I paired them with papers from Bella Blvd's Baby Boy line and a MAMBI Miracle title sticker from my stash.  I used yellow Thickers to spell out LB's monogram on top of the circle, it's just been edited out for privacy.
On the reverse side I put some of the first pictures from one of the first series of pictures from when he was starting to have his eyes open more and not always being the "sleepy baby".  The fabric title sticker is older stash and the orange grid card I wrote some details and the date is from WRMK's Albums Made Easy line I found at Target.  I used some washi tape, a variety of stickers, and twine to dress up one photo pocket.  I love how using divided page protectors make it easy and quick to get some pictures in your album.  Yet it's still possible to put your own touches to them.

Adding divided page protectors to my 12X12 scrapbook albums is something I might have hesitated to do before I started doing Project Life.  I'm glad I found I like the look of PL and how it's easy to translate the concept into my albums to save time.

Signature

Friday, March 22, 2013

Scapbook Page: Tip Toe Through the Tulips for Eggs

It's a two-fer week as far as scrapbooking goes, not only did I have my weekly Baby Boy Scrapbook Pages post but now I have a seasonal layout to show too!
I just fell in love with Pebbles Inc.'s Hip Hip Hooray.  It may officially be a birthday line, but the first thing I thought of was spring, the papers are just so colorful and happy!  When I bought my supplies I could only find it at scrapbook stores but now several pieces of the collection can be found with the scrapbook supplies at Target!  They have a 6X6 pad of the paper that would be perfect for creating a layout similar to this one that I used it to scrap our last egg hunt.  The paper was just perfect!  I love that the back sides of their patterned paper is just as lovely as the front.  I had lots of patterns to play with. 
Here are some of the delightful embellishments that coordinate with the line.  The banner kit comes with four different designs and lots of die cut sticker banners, tons of yumminess there!  I popped mine up with foam for dimension.  The stitched circles are also really fun and I could not resist the big paper blooms with a brad center.  But who are we kidding, I did not even try!  You can fluff them up a bit too.

I used my Martha Stewart Crafts butterfly punch to add some more layers.  Just loved using it to make butterflies, that are layered to give them an in flight look.  I used the reverse side of the patterned papers to make the butterflies and punched circle.  The yellow polka dot strip of paper is actually from the bottom of one of the papers, the reverse side of the label.  So nice how Pebbles Inc. gives you ways to stretch your scrapping dollar. 
My favorite part of the layout is the sweet little pin wheel.  I added one of my favorite song lines to the banners I made and slipped them onto the toothpick handle.  Some My Mind's Eye yellow twine finishes it off.  Because everything is better with twine, these days!

Signature

Thursday, March 21, 2013

A Crafty Soiree #134

Hi Friends!  I had such a great time hopping around to see all the Easter projects last week!  A lot of us seem to have bunnies, baskets, and peeps on the brain.  It was so inspiring to see how many different ways you all manage to turn iconic symbols into delightful projects, so unique and creative!
At Little Treasures, Maya has been crocheting up the sweetest itty bitty baskets, they look great as egg holders and on an Easter tree. 
These days I am all about EASY and these washi tape Easter eggs from Your Homebased Mom are a quick way use, what is probably everyone's favorite new crafting supply, and fancy up inexpensive plastic eggs.  So many of us have at least a roll or two...or twenty on hand!  This would also be a good project for the kids to help with, without the mess of dyes.
This frame gives an unexpected twist and change from the normal wreath shape and I like how the eggs are incorporated into the design of this front door decoration at A Creative Princess.  The eggs were part of a garland last year, so it's also a good example of how you can take what you've already got on hand and switch things up for a completely different look.
I have the same problem that Meghan does from Make Something Daily.  My kiddo loves egg hunts and goes to a few year each year, ending up with way too much candy!  She's got a great idea for including puzzle pieces into eggs so that the kids can work on a cooperative puzzle afterward.  What makes hers really unique is she actually paints the puzzle!  I love her cute pictures!
I picked our last feature because Christine from I Dig Pinterest and I Did it Too, made these as examples for a ladies crafting night she recently hosted.  Her guests also added a layer of decoupaged patterned paper under their vinyl letters, cute!  This is a fun project for a group, that everyone can be successful at.

I have so much fun virtually crafting with each of you every week, and it was nice to hear how some of you are taking your mad crafty skills and converting other to our shared obsession!  Have you hosted a crafting session with your friends?  I'd love to hear what projects have worked for you!

GIVEAWAYS ENDING SOON!
Before we get to the features, don't forget to enter the Secret Recipe for Super Mom ebook giveaway from last week!  You still have one more day!  I've also got a giveaway from Shutterfly that's ending soon.  Don't miss your chance to win one of these awesome prizes!
Photobucket
  • Link up to four of your creative projects (No Etsy stores or other linky parties pretty please).
  • Add your link to the specific posts not the main URL
  • Add a "Crafty Soiree" button to your blog or posts.
  • Please comment on the post linked up in front of you. All party goers love meeting new friends... don't just stop there...if you see something that catches your fancy-- stop by and say hi!
  • Your hostesses would love it if you'd follow us. You can find Malia here.
Photobucket


Signature

Tuesday, March 19, 2013

Project Life 2013: January 6-12

During Week 2, we finished up the room rearrangement that was started last week, LB moved into his own room for the first time, and I took ER to a college gymnastics meet with her Daisy Girl Scout Troop.
This was our second try and adding the office to the bedroom.  Brad liked this way a lot better and I'm really enjoying being able to look out our front window while scrapping.  It works for now, but I'm anxious to have our room back as a just a room and have better access to my extensive book collection, which is currently spread out all over the upstairs.  So are my crafting supplies - I have my larger machine's like the Cricut and my metal dies in the hallway closet now and without somewhere easy to set up my sewing machine I am unmotivated to use it.

LB had his first night in his big boy room.  As of yet there isn't much in there because the "baby" furniture is still in his older sister's room.  The crib is a convertible and she's on the tiny size so it still works to her in it set up as a toddler bed.  We just (in February) ordered her new bed and dresser.  Once it arrives we'll finally be able to set up the two kids rooms.
Have you seen Echo Park's new Photo Freedom line?  Since I really like a lot of their lines I bought their Volume 1 to check it out.  At first it seemed a little bit too Project Life inspired but they are promoting it along the lines of Stacy Julian's book, also called Photo Freedom.  The bright primary colors are just so happy and cheerful and more gender neutral than a lot of what I already own so it has been a nice addition to my stash.  I especially like the monthly calendar paper and used one for this week's date card.
For the second half I have some pictures of the kids trying new foods.  Spaghetti was not a big hit with LB.  He doesn't seem to like pasta of any kind at all, so weird for me since we all love it and ER could practically exhist on mac&cheese alone if we'd let her.  The big news for her is that she's gotten really into eating mini corn, the kind you find in stir frys.

Most of the rest of the page is about the gymnastic's meet we took the Daisy troop to.  It was a lot more fun than I expected.  The kids all got pom poms and loved cheering.  At one point they all got up and danced, they went crazy!  I included a card with the schedule of meets on the back and our tickets.
The other set of pictures on this half are of LB playing with a storage container Daddy brought home.  So funny how kids can take anything and make it a toy.  He loved putting on and taking off the lid and when he got tired of that, banging on it.  I used one of the free Paislee Press photo templates and some washi tape, stickers, and a label to decorate.

Linking up to The Mom Creative.

Signature

Monday, March 18, 2013

Baby Boy Scrapbook Pages: First Walk

For our next page in our Baby Boy Scrapbook Pages series, I have another double page spread that was quick to put together within a grid.  The page design was born out of the fact I only had one piece of the vintage toy patterned paper I wanted to use.  I was able to stretch it as far as possible, by also using the B side of the paper with the letters.
Here are some close up views of each side, click on any images in the post for a larger view.  Please excuse the glare from the page protectors.
I have been on the look out for something to put on top of the rectangle of letter paper, something with a vintage feel to go along with the toy paper design.  I think that part just need a little something.  Sometimes it's the details that pull a look together, like the three brads on my journaling.  I thought those also echoed the circles of the stroller wheels and reinforced the metal of the stroller too.  There are nine pictures of these pages but I think keeping them in a grid keeps things from looking too busy. 

Signature